I’ve been fighting with printing 1.75mm PLA. The thicker brass in the hot end causes the heat to creep up more and make the ‘melt zone’ so long and sticky that the printer jams up. The normal ‘fix’ is to have a small fan blow up into the hot end insulator – the black plastic bit.
This sucks for me. The fans fail – stop spinning, fall apart, etc. The wires pop loose, touch each other, and short out the power mosfet on the RAMPS board. The fan falls down, hits the part, knocks it loose or causes the carriage to skip.
Fan blowing up, cooling the hot end insulator to prevent jamming (This is http://www.thingiverse.com/thing:13343 by the way, the best fan holder I’d found)
The irritating part is, the printer will eat 3mm PLA all day long without a problem without the need for this fan.
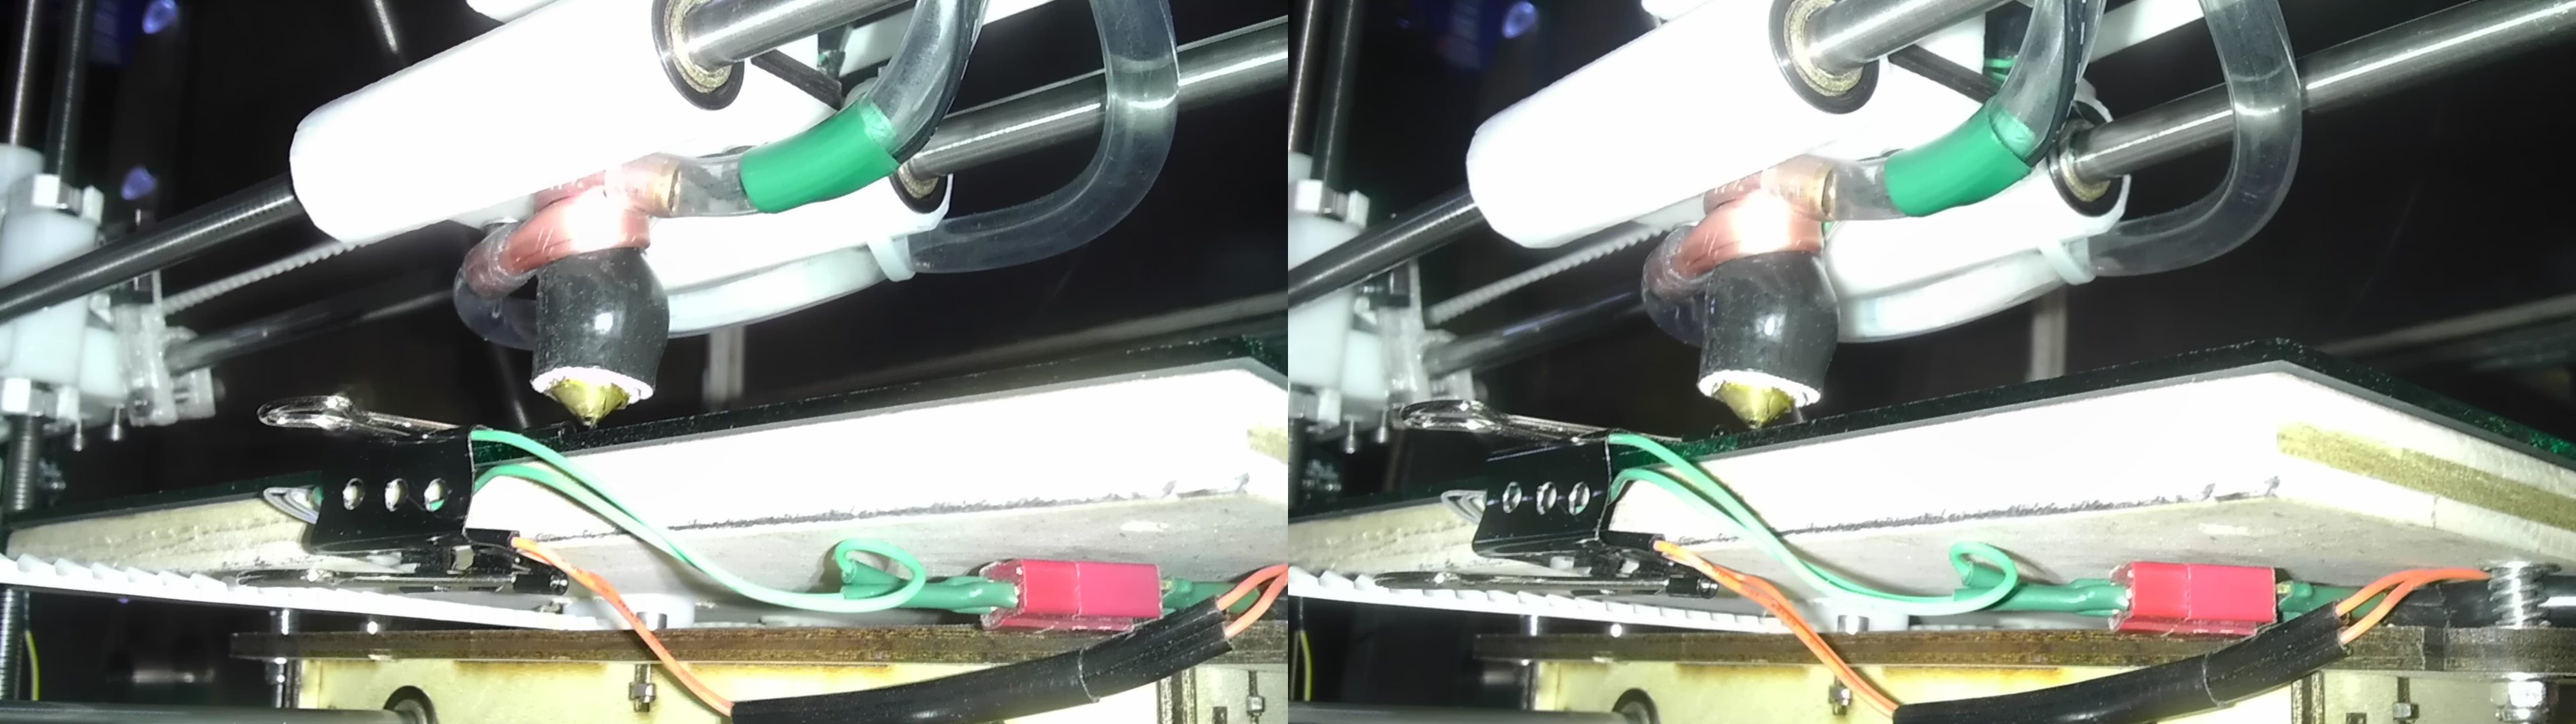
(Stereoscopic images, look at them cross-eyed if you want to see them in 3d)
The parts I got for water cooling my RepRap hot end. A bit of soft copper tubing and some hose.
I cut some tubing with a pipe cutter. I just kinda guessed how long it should be by wrapping my finger around the hot end and cutting the pipe at the length that seemed nice.I deburred the copper tubing with a countersink. The cutter gives me a nice outside edge to slip the tubing over. I wanted a clean inside edge for the water flow.I bent the tube over a screwdriver. I was going to fill the tube with sand so it didn’t kink, but I just started bending and it went around without kinking. I was also thinking of sliding some flat metal inside and hammering it down before it bent, but the bend just kinda happened successfully.I bent the tube around the hotend. I used the pliers to snug up the bend. It’s not really tight, and I wish I had some heat sink compound to help improve the contact between the two surfaces.The ‘wide’ side of the tubing wrap is taking up nearly all the space available along the hot end insulator.I measured out a bit of tubing, cut it off, and slid it onto the copper tubing.I think that the water cooled hot end looks pretty good.I slid a thermistor between the hot end and the water jacket so I can measure the effectiveness of the water cooling.
The task of installing all of this was almost challenging. There was just enough room to be able to slide the hot end up through the carriage, slip on the groove mount, and get it all positioned. The one bolt hole was kinda hiding above the copper tube, but the tube can be spun around a bit so everything can be bolted up snug.
Here is the water cooled hot end installed onto the X carriage. You are seeing most of it in the reflection of the mirrored print bed.Here we are looking up at the hot end water line routing. Also note the drilled holes in the binder clip. This takes a lot of the strength out of the clip so it’s less likely to break the glass or jump off the print bed and land on the far side of the room.Here is the water pump in the aquarium. Just straight fish-poo water. It’s not touching the printer, I am not worried about it. More concerned about the toxicity of the copper to the fish than the toxicity of the fish to the printer.Here is my RepRap 3D printer next to the aquarium that is cooling it. Or is this a photo of my aquarium with the overly expensive electric water heater that happens to print plastic parts? Hard telling…I ran the water and electric wire routing next to each other. The water and thermistor are not part of the ‘main’ wiring harness as I switch between 3mm and 1.75mm nozzles.Note the pretty hard bend in the plastic hose. If it’s less than this, it hits the mount for the X end stop.The water flow through the hot-end is pretty good using the tiny pump I have. I am not seeing a significant difference in temperature from the tank temp to the water from the hot end cooler.
The whole assembly was pretty quick and easy. When I installed the water cooling, I also incorporated the temperature monitoring and soldered the USB cable to the arduino board as the USB-B port got sloppy and would disconnect on me mid-print.
As for some numbers as to how well this works. With no water running through the copper tubing, I am seeing temperatures over 135f after 10 minutes. Yeah, Yeah, I know, RepRaps are metric, but it’s an easy value to convert, go too it. With water running, the top temp I’ve seen is 115f. It likes to run closer to 100-110f. My longest print so far is close to 4 hours without any problems. Without any cooling (and the copper not installed) I’d start to see jamming problems around 1 hour at .1mm layer height. .3mm layer heights would go much longer without problems. I am guessing that the plastic flow volume keeps pushing the heat down the barrel and doesn’t let the transition zone get too long.
I’ve not weighed the copper, tubing and water to see how much extra this weighs over the fan and mounting hardware.
I may run the water around the extruder, X and Y motors to help cool those. Not that they get hot really.
I think I want to mount some SMD LEDs against the tubing for some neat lighting effects. Just so it looks cool.
Very ‘cool’ project! but you will kill your fish! Copper is bad for fish, and will interact with stuff in that mineral rich fishtank water gunking it up and lowering the heat conductivity significantly. Your setup is perfect for a radiator for water cooling a PC. As well, the pumps and fittings used in PC water cooling would be perfect for your needs. You can setup a pump and radiator that are attached to the base of the RepRap to make it part of the unit. It will run ‘clean’ and not need as much servicing as a fish tank! I do a lot of water cooling of PC components (currently 2 video cards and the CPU in the machine I’m typing on), it would be very easy for a person with your creative making ability to make use of the radiators and pumps offered by many water cooling websites to make this functional long term. Check out the liquid cooling section of FrozenCPU.com for some parts that are perfect for your needs.
Ken, The copper is a temporary solution to see if it would work. I am going to get some Stainless Steel brake line or maybe machine an aluminium block and do it again.
The water has a fairly high PH, so the copper isn’t as soluble as it could be if I had a lower PH.
Oh and google ‘galvanic corrosion’ your probably going to have issues with it, with copper and everything in the fish tank.
Again, great project. Love water cooled stuff!
water cooling good for cpu/gpu/apu not for 3d printing
It is about 75% gimmick and unncessary. But it does work really well.