I was playing around last night with making my Rostock to use the full length of the smooth rods even though my belts where not long enough. I didn't want to mess with the spindles used for the Spectra line mechanism.
I came up with a hybrid. It uses the belts for the drive side, and the fishing line on the idler side. I also am using a zip-tie tensioner.
Doing things this way, we only need belts as long as our smooth rods.
It's not running yet, as I am waiting on my pololus. But it looks like it should work out.
Delta RepRap using both belts and Spectra fishing line I have this new RepRap 3D printer that I am putting together. It is based on the Rostock style printer. It came to me half assembled, sans electronics. It had been running, but got pirated for part…
I have this new RepRap 3D printer that I am putting together. It is based on the Rostock style printer. It came to me half assembled, sans electronics. It had been running, but got pirated for parts to make another Prusa.
It has this awesome, expanding, laser cut acrylic case. But the case was set up to only go ‘normal’ Rostock height based on the length of the belts. There is a lot more room on the smooth rods for it to get taller. I just need to make a belt stretcher (I am too cheap to buy longer belts).
I just so happen to have just the thing. I have some fishing line I picked up on clearance a few years ago – $6. It just so happens to be the 65lb Spectra line that people are using to string up their Kossels.
So I decided to do both. Belts for the drive and line for the ‘idler’ side. I also wanted to include the zip-tie tensioner concept I’d seen.
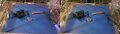
Making some little copper rings so the line doesn’t cut my belts. I just nipped off a bit of tube left over from my water-cooling experiment and deburred them.Here you can see my belt to carriage connection and also the belt to line connection.The fishing line goes over the top pully. I looped mine a couple of times, giving me a total of 4 strands. 260lbs tensile should reduce the stretch and bouncing other people are seeing with just a single line. The Z endstop provides enough gap to allow for the connection.
It turns out, that doing this, you need a belt as long as your smooth rods. Conversely you can make your smooth rods as long as your belt.
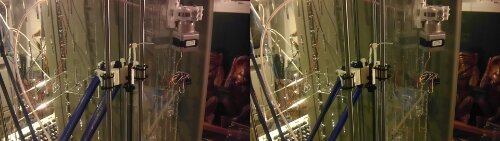
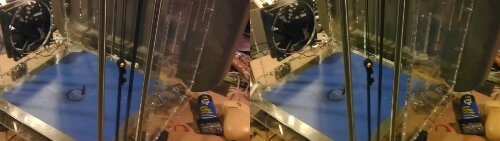
I can drop the carriage right to the ‘floor’ and still not interfere with the coupling.Two of the three towers belted or strung. I’ve not done the back tower. Each one is getting done slightly different, so I can see which I like the best.This shows the zip tie being used to tension the belts. Just take another click on the zip tie, and it’s tighter. I am wondering how long these things will last before they break and what kind of damage that will incur. I may try bailing wire on the next iteration.
This begs the question. Is this a Rostock or a Kossel? (Looking at the drive, not the smooth rods vs extrusion frame). Rossel? Kostock?
I know I am naming this machine the Solar Scribbler. It will live in my garage workshop for a few reasons.
The upright rods means that sawdust and crud won’t settle on them near as much. Also the chassis helps keep airborne crud out.
But the garage is getting a few solar panels and some deep cycle batteries installed. So the printer will run on solar power! I figure the deep cycle batteries should be able to power the heated bed to ABS temps without a problem.
I made something to help me make something. If this trend continues, I can see a dangerous chain of events occurring at some far point in the future.
A friend of mine and I designed on a napkin (Actually, it may have been a white board, but bear with me) some corner brackets so we can use simple ratchet straps as corner clamps for large woodworking projects.
The corner brackets feature a lip to help keep them from sliding out from under the strap. They also feature a glue slot to help keep them from getting glued to the project.
I used these little plastic bits to help me make a toybox for my children. I will soon make a 2nd one as well, but, lets just stick to the story about the first toy box for now. And Ratchet Straps… And 3d Printers… And Stereoscopic photographs – because at least that way people have a better experience when looking at my website and go cross-eyed.
I used some ratchet straps to hold the toy box together while I am test-fitting the pieces.I printed the corner clamp brackets out on my MakerGear Prusa Mendal RepRap 3d Printer. I just love that tool… Wait… I made a tool to make some tools to make a toybox… See, this is starting to get dangerous.The plastic corner brackets allow me to tighten the ratchet straps up much tighter.The lip on the plastic bracket helps keep everything where I set it. The strap doesn’t dig into the tip of the wood so I can slide the corner up and down and in and out to get a better joint.There is the wooden base there, but it’s not visable. The rope and bungee cord helped keep the box held together while I glued everything up. I can slide an end panel out, smother it in glue, and fit it back in place. The rest of the boards didn’t try to fall over because of the bungee (I’d removed the 2 straps for the gluing phase)Bella loved that I was making her toy box with ribbons! She helped me sort out the straps and untangle them.Believe it or not, this is a big help. She LOVES helping. I am a bit bummed as I had to keep her away from this one due to the gorilla glue…Three sets of straps seems to have held the box together well.I broke one of the corner brackets. The hook lined the strap up just right that it put extra force on the bracket and I crushed it.I turned everything upside down and glued and strap-clamped the bottom on. This one didn’t get the plastic bits, as they where still printing and I was impatient, and the strapping dug into the wood pretty bad.The corner brackets sure do make the ratchet strap clamps work nicely.I am thinking of how to redesign the brackets so they won’t break like this one did. Luckily they are pretty easy for me to replace.The brackets take about an hour to print each or so. I can just start the printer, and walk away and let it do it’s thing while I do my thing. This batch was given away to those who had input in the design.
I got a box in the mail. Bella was using it as a chair in the living room when I got home from work. I asked her what she thought was in it. She said “A Race Car”.
Funny thing is, the kid was right!
It was my rolls of plastic for my 3d printer. The box has whatever we want in it that my printer can print.
So I printed a race car, put it in the box, and the two of us opened the box right before bed time.


